
A deck railing isn’t just a safety requirement, it’s the finishing touch that makes your outdoor space feel complete and protected. Whether you’re building your first deck or upgrading an existing one, understanding how to install a solid railing system is essential. This guide walks you through the entire process, from understanding local codes to selecting materials and completing the installation. You’ll learn what professional builders know about proper post installation, balusters spacing, and long-term durability so your deck railing stands strong for decades.
Table of Contents
ToggleKey Takeaways
- Building a deck railing requires compliance with local building codes, including a minimum 42-inch height and balusters spaced no more than 4 inches apart to ensure safety and prevent falls.
- Proper post installation with concrete footings set 30 inches deep (below the frost line) and bolted to the rim board creates a durable railing system that withstands lateral forces and weather exposure.
- Post spacing of 4–6 feet apart, combined with quality materials like pressure-treated 4×4 lumber and galvanized fasteners, ensures your deck railing lasts decades with minimal maintenance.
- Common railing styles range from traditional vertical balusters to modern horizontal rails and low-maintenance composite options, each offering different aesthetics and durability trade-offs.
- Pulling a permit before installation protects your investment and ensures your deck railing meets current code requirements, preventing liability issues if you sell your home.
Why Deck Railings Matter
A deck railing serves two critical purposes: safety and aesthetics. From a safety perspective, a properly installed railing prevents falls and meets local building codes designed to protect occupants. A railing that’s too weak, has gaps that are too wide, or lacks proper post support creates a genuine hazard, especially with children or elderly visitors on your deck.
Beyond code compliance, railings frame your outdoor space and define its character. A well-designed railing can enhance curb appeal, complement your home’s architecture, and increase property value. The difference between a hastily installed railing and a thoughtfully built one shows in the details: consistent spacing, level rails, and solid construction that doesn’t wobble when you lean on it.
DIYers often underestimate the railing because posts seem straightforward, dig holes, set them, bolt rails on. But the devil is in the execution. Post spacing, concrete depth, baluster spacing, and rail height all work together to create a system that’s both code-compliant and built to last.
Understanding Deck Railing Codes and Requirements
Building codes vary by jurisdiction, but the International Residential Code (IRC) sets standard baseline requirements for residential deck railings. Most areas require a minimum railing height of 42 inches (measured from the deck surface to the top of the rail). This prevents accidental falls and provides a visual barrier.
Baluster spacing, the gap between vertical balusters, must not exceed 4 inches. This rule prevents a child’s head from getting stuck. Some jurisdictions interpret this strictly (no gap larger than 4 inches at any point along the baluster), while others use a 4-inch sphere test (a ball larger than 4 inches shouldn’t pass through). Before you buy materials, contact your local building department or check their website for specific requirements. Codes also often specify minimum post size (typically 4×4 lumber), maximum span between posts, and load ratings (the railing should resist a 200-pound horizontal force).
Permit requirements depend on your area. Many jurisdictions require a permit for deck work, including railing installation, while others wave the requirement for railing replacements on existing decks. When in doubt, pull a permit. It’s insurance that your work meets current code and won’t create liability issues if you sell your home.
Tools and Materials You’ll Need
Materials:
• Posts: 4×4 pressure-treated lumber (or composite if you prefer low maintenance)
• Rails: 2×6 or 2×8 pressure-treated lumber (top and bottom rails)
• Balusters: 2×2 or 1×4 lumber, or composite balusters
• Concrete: 60-pound bags for post footings (approximately 1–2 bags per post, depending on depth and soil type)
• Fasteners: 3½-inch galvanized lag bolts and washers, or stainless steel if you want maximum corrosion resistance: 2½-inch galvanized deck screws for rail-to-post connections
• Metal brackets or hardware: Post bases (if using concrete footings above grade) and lag bolt hardware
Tools:
• Circular saw or miter saw (miter saw gives cleaner crosscuts on rails)
• Power drill with bits (including a spade bit for pilot holes)
• Level (4-foot is ideal for checking post plumb)
• Tape measure (25-foot minimum)
• Post hole digger or power auger (for digging footing holes)
• Adjustable wrench or socket set (for tightening lag bolts)
• Clamps or quick-clamps
• Safety gear: work gloves, eye protection, dust mask (when drilling), and hearing protection if using a power auger
If you don’t own a power auger and are digging multiple post holes, consider renting one. Hand-digging 3–4 holes 30+ inches deep in hard soil is exhausting and often drives DIYers toward shortcuts that compromise the build.
Step-by-Step Installation Process
Measuring and Marking Post Locations
Start by determining post spacing. Most builders space posts 4–6 feet apart along the deck perimeter. Closer spacing (4 feet) looks more elegant and handles snow load or lateral forces better: 6-foot spacing is acceptable and saves material. Measure from the deck corner and mark post locations with chalk or a felt-tip pen on the rim board or blocking that sits atop your deck structure.
Next, mark where holes will be dug. Posts sit either above the rim board (bolted through the rim) or hang from the rim using galvanized hangers. For a solid, traditional installation, most DIYers prefer posts bolted to the rim. Mark the center of each post hole at least 12 inches out from the rim board, perpendicular to the deck line. Use a speed square or combination square to ensure marks are square to the deck edge.
Installing the Posts and Rails
1. Dig footing holes. Each post needs a hole approximately 30 inches deep (below the frost line in most areas) and 8–10 inches in diameter. Check your local frost line depth, it varies by region. In colder climates, deeper footings prevent heaving as soil freezes and thaws. Dig straight down: slightly angled holes make post installation harder.
2. Set posts in concrete. Place the 4×4 post in the hole and use a level to check that it’s plumb (vertical) in two directions. Have a helper brace the post with 2×4 braces while you pour concrete. Mix one 60-pound bag of concrete per footing (follow package instructions for water), pour it around the post, and tamp it down to remove air pockets. The concrete should fill the hole to just below grade level. Let concrete cure for 24–48 hours before hanging weight on the posts.
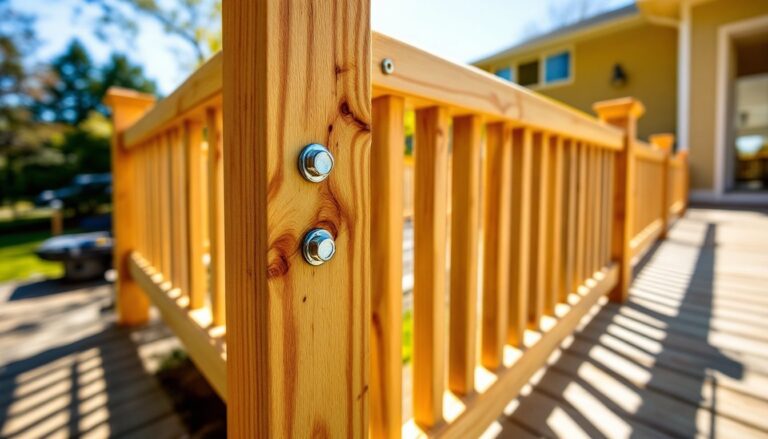
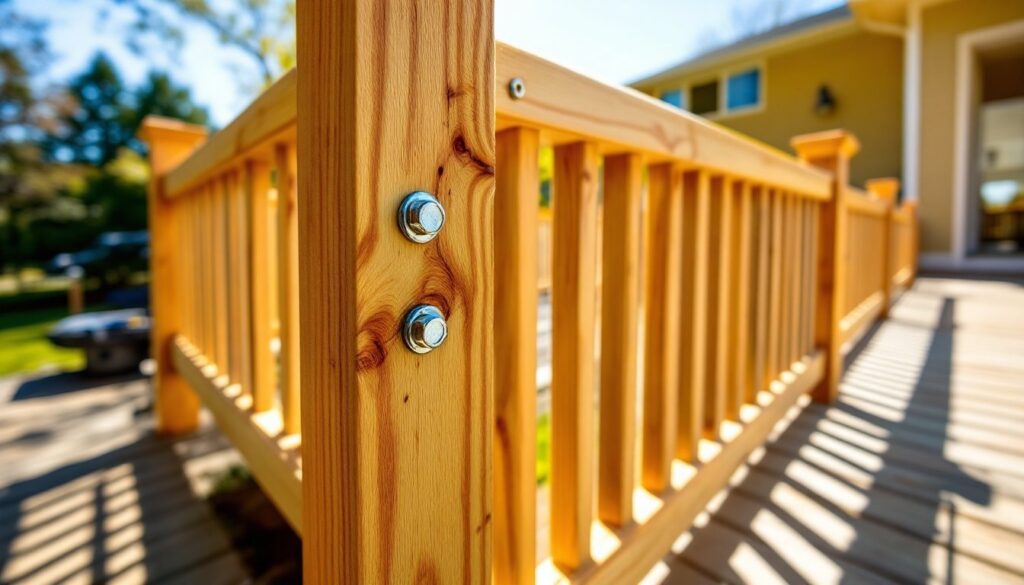
3. Bolt posts to the rim board. Once concrete has cured, use a level again to verify the posts are still plumb. Drill pilot holes through the posts and into the rim board (or deck frame), then install 3½-inch galvanized lag bolts with washers. Use at least two bolts per post, spaced vertically at least 6 inches apart. Tighten bolts firmly but don’t over-tighten: galvanized hardware can snap.
4. Install rails. Cut your top and bottom rails to length. The bottom rail typically sits 8–12 inches above the deck surface: the top rail must reach at least 42 inches from the deck surface. Use 2½-inch galvanized deck screws (or bolts, if you prefer) to attach rails to posts. Most builders drive three screws per rail-to-post connection for solid attachment. Check that rails are level and that spacing between them is consistent so balusters fit properly.
5. Install balusters. Cut balusters to the exact length needed (accounting for the 4-inch spacing rule). Start at one end and measure carefully as you space them. Clamp balusters in place before screwing them to top and bottom rails. This prevents them from shifting as you fasten. Drive two 2½-inch screws per baluster into each rail. Step back frequently to eyeball the work: consistency matters.
Common Railing Styles and Design Options
Traditional wood balusters are the most common and affordable choice. A 2×2 baluster, spaced to the 4-inch code, creates a clean, classic look that fits almost any home style. This approach pairs well with top and bottom rails made from 2×6 or 2×8 lumber. The open design allows sightlines and doesn’t block views.
Horizontal rails have become popular in modern and transitional homes. Instead of vertical balusters, horizontal 2×4 or 2×6 boards span between posts, creating a contemporary aesthetic. These are quick to install but require more careful spacing, horizontal boards must still comply with the 4-inch rule, measured vertically. Horizontal railings also collect debris and snow more readily than vertical designs.
Composite and vinyl railings eliminate the need for staining, sealing, or painting. Materials like Trex or Fiberon are heavier than wood (so concrete footings are essential) and more expensive upfront, but they last 20+ years without maintenance. They’re ideal if you dislike annual stain reapplication. Colors are usually limited to grays, browns, and blacks, though selection is expanding.
Balusters with cutouts or decorative details add personality but increase install time. If the design reduces the structural integrity of the baluster or creates gaps wider than 4 inches, it won’t pass inspection. Check codes before ordering decorative balusters.
Cable and metal railing systems are available for a modern, minimalist look, but they’re often best left to professionals and cost significantly more than wood or composite systems. Metal railings also conduct heat and cold, which can be uncomfortable in extreme climates.
Whatever style you choose, prioritize durability. Pressure-treated lumber rated for ground contact resists rot better than untreated wood. If using standard pressure-treated lumber, plan to stain or seal it every 2–3 years to maintain appearance and extend its life. Woodworking project plans and reviews on construction techniques can provide detailed design inspiration and material comparisons for custom railing builds.