
Building a bathroom vanity isn’t just about saving money, it’s about creating exactly what you need in the space you have. Whether you’re working with a cramped powder room or a sprawling master bath, a custom-built vanity lets you control dimensions, storage, and style in ways a store-bought unit can’t match. This guide walks you through the entire process, from selecting materials to installing the sink and countertop. You don’t need to be an experienced woodworker to succeed: solid planning, the right tools, and honest assessment of your skill level are what matter most.
Table of Contents
ToggleKey Takeaways
- Building a bathroom vanity gives you complete control over dimensions, storage, and style to fit your specific space and needs better than store-bought units.
- Choose your materials wisely—plywood is budget-friendly and stable, solid wood offers premium looks, and MDF paints beautifully but isn’t ideal for humid bathrooms.
- Standard vanity dimensions are 24 inches deep, 36 to 48 inches wide, and 30 to 36 inches tall; always check your local building codes and plumbing rough-ins before starting.
- A basic vanity build requires essential tools like a miter saw, drill-driver, tape measure, and clamps—professional equipment like table saws and pocket-hole jigs speed up the process but aren’t mandatory.
- Measure your plumbing rough-in carefully (supply lines are typically 8 inches center-to-center) and sketch your layout before cutting, as precise planning prevents costly mistakes during installation.
- Use moisture-resistant paint or stain, secure the finished cabinet to wall studs with exterior-grade fasteners, and consider hiring a professional plumber for supply and drain connections to avoid water damage and leaks.
Understanding Your Vanity Options and Materials
Before you pick up a single board, decide what you’re building. A vanity cabinet is essentially a box that sits against the wall and holds your sink. Most cabinets are either freestanding units you make from scratch or assemblies using face-frame construction, where a wooden frame forms the front, with plywood or solid wood for the sides and back.
For materials, you’ve got three main paths: plywood with hardwood edges, solid wood lumber, or cabinet-grade MDF (medium-density fiberboard). Plywood is budget-friendly, stable, and works beautifully when you apply veneer or paint. Solid wood looks premium but costs more and requires careful acclimation to humidity. MDF is smooth, paints like a dream, and won’t move much, but it’s heavy and sensitive to moisture, so it’s not ideal for bathrooms without good ventilation.
Think about vanity depth, width, and height before you commit. Standard vanities are 24 inches deep, 36 to 48 inches wide, and 30 to 36 inches tall. These dimensions work with most plumbing rough-ins and feel proportional in most bathrooms. Actual bathroom codes vary by jurisdiction, so check with your local building department if you’re renovating as part of a larger project that might require permits.
Tools and Materials You’ll Need
Keep your tool list practical. A miter saw or circular saw (plus a straight-edge guide), drill-driver, tape measure, square, pencil, and clamps are essential. A table saw is a bonus for ripping boards to width, but it’s not mandatory if you have straight cuts done at the lumber yard. For finishing, you’ll want 120-grit, 150-grit, and 220-grit sandpaper, wood filler for gaps, and either paint or stain.
Materials depend on your design, but for a basic 36-inch vanity, expect:
- ¾-inch plywood (one sheet covers most cabinet sides)
- 2×4 lumber for the frame (typically 4 to 6 pieces)
- ¾-inch hardwood strips for edge banding or trim
- Wood screws (1¼-inch and 2½-inch)
- Wood glue, filler, primer, and paint or stain
- Cabinet hardware (handles or knobs, optional but finish the look)
Don’t cheap out on screws: exterior-grade screws resist rust better in damp bathroom conditions. For the sink itself, choose between a drop-in sink (sits on the countertop lip), an undermount sink (fastened from below for a sleek look), or a vessel sink (sits on top like a bowl). Each requires different support and cutout strategies.
Preparing Your Space and Planning the Layout
Start with accurate measurements and a sketch. Measure the wall where the vanity will sit, note the height of electrical outlets and any pipes, and locate wall studs using a stud finder. Studs matter because they give you solid fastening points when you anchor the finished cabinet to the wall.
Locate your plumbing rough-in. The drain and water supply lines should already be framed into the wall if you’re replacing a vanity, or they’ll be stubbed out if it’s new construction. Measure from the finished floor, from the wall, and between the hot and cold lines. The standard center-to-center distance for supply lines is 8 inches, but confirm yours before cutting your countertop hole.
Sketch your cabinet layout, marking where drawers and cabinet doors will go. Plan the opening for the sink, typically 18 to 20 inches wide for most drop-in sinks, but check your sink’s specifications. Note that the basin itself usually sits 4 to 6 inches inset from the vanity edge once installed, leaving room for backsplash or tile.
Building the Cabinet Base and Frame
Assembling the Basic Structure
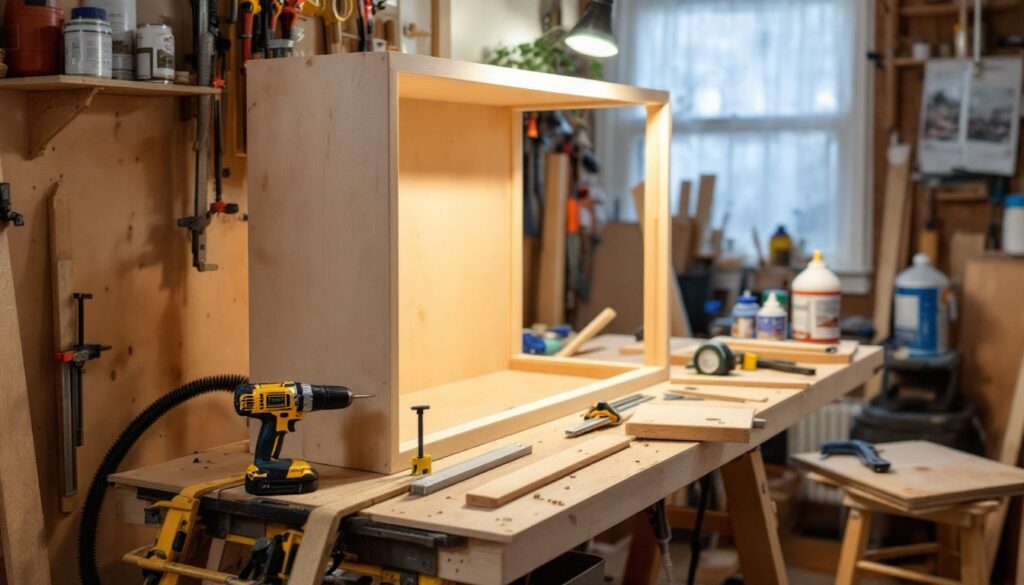
Start by cutting your plywood pieces for the sides, top, and bottom. Use a circular saw with a straight-edge or rent time at a tool library to get clean, perpendicular cuts. Lay out your pieces on sawhorses and do a dry fit, clamp them together without fasteners to check that edges align and corners are square.
The face frame is your next step. Cut 2×4 or 2×2 lumber for the vertical stiles (outer edges) and horizontal rails (top, bottom, and any middle dividers). A typical 36-inch vanity has a top rail, bottom rail, and a center stile creating two bay openings for doors or drawers. Use a pocket-hole jig (like a Kreg Jig) to join rails to stiles, this hides fasteners and creates stronger joints than face screwing. If you don’t own a jig, exterior-grade pocket holes cost about $30 and take 30 minutes to master.
Glue and screw the face frame to the plywood sides using 1¼-inch screws. Space screws every 6 to 8 inches. Double-check that the whole assembly is square by measuring corner-to-corner (diagonals should be equal). Uneven cabinets won’t sit flush against the wall, and doors won’t close properly later.
The back can be ¼-inch plywood or MDF nailed or stapled on, this adds rigidity and prevents racking (the cabinet twisting out of square). Scribe the back to fit wall imperfections: don’t force it tight. Your cabinet needs to sit proud of the wall enough for the finish material (tile, paint, or backsplash) to sit neatly behind it.
Installing the Sink and Countertop
Countertop material comes in three common forms: laminate, solid surface (Corian-style), and natural stone (granite, quartz, marble). Laminate is cheapest, durable for a bathroom, and you can often order pre-cut vanity tops with the sink hole already routed. Solid surface is seamless, repairable, and mid-range in cost. Stone looks stunning but requires sealing, can stain, and costs the most.
If you’re using a pre-made countertop, great, drop it on the cabinet, check that overhangs are even (typically 1 to 1.5 inches on sides and front), and secure it from below with brackets or silicone adhesive. If you’re making your own, you’ll need a router with a template to cut the sink opening accurately. Measure twice, mark the opening center, and test-fit the sink before committing to the cut.
For a drop-in sink, apply a bead of silicone caulk around the rim and lower the sink into the opening. The sink’s lip sits on the countertop ledge. Tighten the clamps underneath (usually three to four points) just snug enough, over-tightening cracks the sink. For an undermount sink, the sink mounts from below using brackets: this is trickier and often justifies hiring a professional installer, especially if you’re unfamiliar with the specific sink type.
Connect supply lines and the drain once the sink is secure. Use braided stainless-steel supply hoses with shut-off valves: these last decades and resist kinks better than cheap rubber hoses. The P-trap under the sink should slope gently toward the wall drain, not level, not kinked. If the plumbing feels beyond you, call a plumber. A bad drain connection leaks into the cabinet and rots wood, costing way more to fix than a two-hour service call.
Finishing Touches and Installation Tips
Sand the entire cabinet with 220-grit sandpaper: this prep work determines how your finish looks. Fill any screw holes or gaps with wood filler, let it dry, and sand smooth. Wipe down with a tack cloth to remove dust, paint won’t stick to dust, and it’ll show under any finish.
Apply primer (one or two coats) and then paint or stain. In a bathroom, use semi-gloss or satin finish paint designed for moisture: matte finishes hold moisture and can mildew. If you’re staining, remember that plywood veneer takes stain unevenly, use a conditioner first, or expect blotchy results. One coat of stain rarely looks rich enough: plan on two or three thin coats for depth.
Before moving the finished cabinet into place, make sure your pathway is clear and the wall behind is prepped. If you’re tiling behind the vanity, do that work first, wet tile work after you’ve installed the cabinet is messy and risks water damage. Secure the cabinet to wall studs using exterior-grade wood screws or lag bolts, drilling from the inside of the cabinet back. Use two fasteners minimum per stud, and hit at least two studs.
Step back and check your installation. The cabinet should be plumb (straight up and down, checked with a level on the sides and front) and sit tight to the wall. Gaps larger than a dime will be visible and trap dust and water. Use shims under the base if the floor isn’t level, and caulk gaps along the backsplash once everything is in place. Projects like rustic bathroom vanities showcase how thoughtful finishing details elevate a basic cabinet. If you want to learn more about the build process itself, woodworking project plans and DIY furniture guides offer step-by-step documentation that complements hands-on experience.
Install cabinet hardware once everything is set. Align handles so they’re centered on doors or drawer fronts, typically 2 to 3 inches from the top or bottom edge. Use a template if the hardware comes with one, wrong placement ruins the look and usability.