
Building a patio with pavers is a rewarding DIY project that can transform your backyard into a functional outdoor living space. Unlike concrete slabs or asphalt, pavers offer flexibility in design, easier repair (you can replace individual units), and a polished aesthetic that complements most home styles. Whether you’re working with clay brick, concrete, or natural stone, the fundamentals remain the same, solid prep work, proper drainage, and attention to pattern and spacing. This guide walks you through the entire process, from site preparation to the final maintenance touches, giving you the confidence to tackle this project yourself.
Table of Contents
ToggleKey Takeaways
- Building a patio with pavers offers superior durability and flexibility compared to concrete, allowing you to replace individual units and choose from diverse materials like clay brick, concrete, travertine, and porcelain.
- Proper foundation preparation—including excavation to 6 inches, landscape fabric installation, and compacting the 4-inch base layer in 2-inch lifts—is the most critical step for a long-lasting patio.
- Use a plate compactor (rentable for $40–60/day) rather than manual tamping to achieve proper soil density and prevent future settling or shifting.
- Lay pavers with consistent 1/8-inch joint spacing, use a wet saw for clean cuts, and allow 24–48 hours of dry weather for polymeric sand to cure before foot traffic.
- Maintain your patio with regular sweeping, annual low-pressure power-washing, and refreshing polymeric sand every 2–3 years to keep it looking sharp and functional for decades.
Why Choose Pavers for Your Patio
Pavers deliver several advantages over poured concrete or stamped surfaces. Individual units can be replaced if one cracks or shifts, saving you money on repairs down the road. They’re also permeable, especially porous concrete or clay varieties, which helps rainwater drain naturally rather than pooling or running off onto your neighbor’s property. This reduces flooding risk and supports local drainage codes in many jurisdictions.
Patterns are another draw. Running bond (like brickwork), herringbone, and Versailles layouts give a custom, high-end appearance without the contractor price tag. Pavers also come in diverse materials: clay brick (classic, durable), concrete (affordable, color options), travertine (elegant, naturally slip-resistant), and porcelain (modern, stain-resistant). Your choice depends on climate, foot traffic, and budget. In freeze-thaw regions, choose frost-resistant materials: in wet climates, slip-resistant surfaces prevent accidents.
One caveat: pavers require proper base preparation. Cut corners on grading, compaction, or edging, and you’ll face shifting, settling, or weeds poking through in a season. The upfront investment in materials and sweat pays off in longevity.
Gather Your Materials and Tools
Materials:
- Pavers (order 10% extra for cuts and future replacement)
- Landscape fabric (weed barrier)
- Paver base or crushed limestone (4 inches minimum for patios: check local codes for load-bearing requirements)
- Polymeric sand (binds pavers, prevents weed growth: standard or polymeric grit varies by supplier)
- Paver edging or restraint system (metal or plastic)
- Gravel or decomposed granite for drainage layer (optional but recommended)
Tools:
- Shovel, wheelbarrow, and work gloves
- Plate compactor or hand tamper (essential, don’t skip this)
- Level (2-4 foot) and string line for alignment
- Paver saw or wet saw for cutting (circular saw with masonry blade works, but a wet saw produces cleaner, safer cuts)
- Rubber mallet for tapping pavers level
- Tape measure, pencil, and square
- Safety gear: goggles, dust mask (N95 or P100 for masonry dust), work gloves, and ear protection for power tools
- Broom for sweeping sand
Rent a plate compactor if you don’t own one, $40–60 per day. Manual tamping won’t achieve the density you need for a long-lasting patio.
Prepare Your Patio Foundation
Mark and Excavate the Area
Start by staking out your patio boundary with string and chalk. A 4×8-foot minimum is workable: larger patios (8×12 feet or more) feel more inviting and practical. Check for utilities (gas, electric, water) by contacting your local dig-safe service or using a metal detector. Many jurisdictions require this call before you dig.
Excavate to a depth of 6 inches, 4 inches for the base layer plus 1 inch for pavers plus 1 inch for sand. Slope the grade at 1/8 inch per foot away from your house to shed water. Use a line level to confirm the slope: poor drainage creates puddles and premature settling.
Remove all roots, rocks, and compacted soil. Loose soil underneath will cause pavers to sink unevenly. If the soil is very soft or clay-heavy, excavate deeper (8 inches) and add an extra 2 inches of drainage gravel.
Compact the Base Layer
Lay down landscape fabric to suppress weeds (but allow drainage). Don’t overlap fabric edges: they’ll create weak spots. Spread a 2-inch drainage layer of gravel or decomposed granite, then compact firmly with your plate compactor, make two to three passes per area.
Next, add the 4-inch paver base (crushed limestone or recycled asphalt). Dampen it lightly (a garden hose is fine), then compact in 2-inch lifts. Proper compaction is the single most important step. Each lift should be compact enough that you can’t easily push your boot heel through it. Cheap patios fail because homeowners skip this or rush it.
Finish by spreading a 1-inch sand layer (polymeric or regular concrete sand). Level this with a screeding board, a straight 2×4 dragged across the base in a sawing motion. This layer is your guide for paver height.
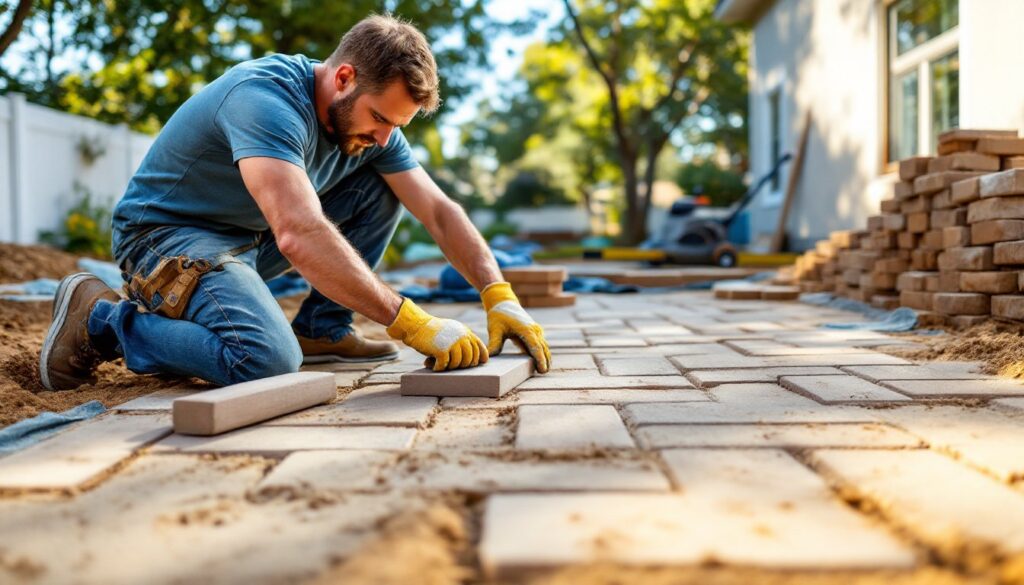
Lay Your Pavers and Set the Pattern
Start in a corner and dry-lay your first few rows to confirm your pattern and identify cut lines early. Use a rubber mallet to tap pavers level as you set them, checking constantly with your level. Pavers should be snug (1/8 inch joint width typical) but not forced, forcing them can crack edges or crack the paver itself.
For herringbone patterns, you’ll cut many pavers, especially at edges. Use a wet saw for clean, dust-free cuts (wear a dust mask). A circular saw with a masonry blade works but produces harsh dust and creates chipping: if you go this route, cut outdoors, wear goggles and a respirator-style mask, and let the saw cool between cuts.
Work in small sections, say 2×3 feet at a time. As you complete each section, brush dry sand into the joints, tamp lightly, then sweep off excess. Do not oversaturate joints yet: that comes after the entire patio is laid.
If edges of your patio fall on partial pavers, you have two options: cut pavers to fit, or install edge restraint behind full-width pavers (metal edging is cleaner and more professional). Edge restraint prevents pavers from creeping outward under foot traffic and soil pressure.
Once all pavers are set, brush the polymeric sand into every joint (dry, not pre-wetted). Sweep away excess so about 1/2 inch of sand sits in the joint. Then mist the entire patio lightly with water, a garden-hose mist, not a heavy spray. The polymeric sand activates and hardens as it dries. Allow 24–48 hours of dry weather before foot traffic.
Finish and Maintain Your Patio
Once pavers are set and sand is cured, your patio is functional. But proper maintenance extends its life and keeps it looking sharp.
Immediate aftercare: Avoid heavy use for the first week, especially in wet weather. Polymeric sand is still hardening, and premature water or weight can disrupt joints.
Seasonal upkeep: Sweep debris and leaves regularly to prevent staining and organic growth. Powerwash annually (use low pressure, 1500 PSI max) to remove moss and algae in damp climates. Interior design trends often feature patio hardscaping as an extension of your home, and a clean patio enhances curb appeal and usability.
Weeds and joints: Even though your landscape fabric, some weeds may emerge in joints over time. Pull them by hand or spot-treat with herbicide (follow label instructions). If polymeric sand erodes, refresh it every 2–3 years by sweeping dry sand into joints and misting to reactivate.
Settling and shifting: If a paver sinks or rocks, carefully remove it and your neighbors’ pavers around it, add sand underneath, and reset. This modularity is why pavers beat concrete. For structural concerns, such as a whole section settling or water pooling, you may need a professional assessment.
Your patio can benefit from sealant applied every 1–2 years, especially on natural stone. Sealant protects color, reduces staining, and eases cleaning. Choose a sealant suited to your paver type: ask your supplier or check the manufacturer’s recommendations.
Building a patio with pavers is a manageable weekend or two-week project for most DIYers. The real secret is respecting the prep work and taking your time on compaction and grading. Once done right, you’ll enjoy a beautiful, durable outdoor space for decades, and the satisfaction of having built it yourself.