
Building a wine cellar at home is one of those projects that feels ambitious until you break it down into manageable steps. Whether you’re a serious collector storing rare vintages or someone who enjoys a good bottle and wants proper storage conditions, a DIY wine cellar protects your investment and creates a functional, beautiful space. The good news: you don’t need a sprawling basement or a six-figure budget. The key is understanding three things, location, climate control, and smart design, before you pick up a hammer. This guide walks you through each stage, from selecting your space to maintaining the perfect environment for long-term wine preservation.
Table of Contents
ToggleKey Takeaways
- Building a wine cellar requires three critical foundations: choosing a cool, dark, vibration-free location; maintaining stable temperatures between 45–65°F with humidity around 70%; and installing proper insulation and climate control systems.
- Invest in dedicated cooling systems ($1,500–$4,000) and insulated doors rather than cheap portable solutions, as consistent temperature control is essential to prevent premature aging and cork damage.
- Horizontal wine storage on metal or wood racking keeps corks moist, prevents oxygen infiltration, and allows you to fit 300+ bottles in a compact 4×6 space with floor-to-ceiling installation.
- LED lighting, sealed flooring, and small circulation fans are finishing touches that protect your wine collection while making the cellar functional and easy to maintain.
- Ongoing maintenance—checking temperature and humidity weekly, cleaning cooling filters monthly, and ensuring proper ventilation—keeps your wine cellar operating efficiently for long-term wine preservation.
Choosing The Right Location And Space
The right location makes or breaks a wine cellar. You’re looking for a space that stays cool, stays dark, and stays vibration-free. Basements are the obvious choice because they’re naturally insulated, but a corner of an unfinished garage, a closet under stairs, or even a spare bedroom can work if you control the climate properly.
Avoid spaces near exterior walls in warm climates, heat transfer will fight your cooling system. Skip areas near HVAC ducts, water heaters, or furnaces: they radiate warmth and create temperature swings. If you’re putting a cellar under a living area, check for vibration from foot traffic and appliances, excessive movement affects wine and can damage cork seals over time.
Size matters less than consistency. A compact 50-bottle cellar in a 4×6 closet works better than a sprawling, poorly insulated space. Aim for a footprint that lets you install proper insulation without losing too much usable floor area. Consider access: you’ll be walking in and out regularly, so it shouldn’t be a crawlspace you dread entering.
If structural walls need modification, hire a structural engineer to confirm load paths. This is one area where a professional assessment pays for itself, a mistake here is expensive. Many homeowners explore options like finished basement ideas to understand how to maximize an underutilized space for a dedicated wine room.
Essential Climate Control And Temperature Management
Wine demands stability. The ideal temperature range is 45–65°F, with 50°F as the sweet spot for most reds and whites. Humidity should stay between 50–80%, ideally around 70%. Temperature fluctuations of more than 5°F per day age wine prematurely and can push corks out of bottles.
You’ll need two things: insulation to reduce external temperature swings and a cooling system to maintain setpoint. Don’t cheap out on cooling, a $300 portable air conditioner won’t hold consistent temps in a 100-bottle cellar. Budget $1,500–$4,000 for a dedicated wine cooler or split-system cooling unit, depending on space size and local climate.
Measure your room’s heat gain in summer and heat loss in winter. If you’re in a cold climate and the cellar sits in an unheated space, heating may be your bigger challenge. A small electric heater with a thermostat (around $100–$200) paired with a cooling unit gives you year-round control.
Insulation And Cooling Systems
Start with walls. Seal any air leaks around pipes, outlets, and penetrations with caulk or expanding foam. Install 2–4 inches of rigid foam insulation (R-10 to R-20) or fiberglass batts. If your cellar is in a basement against a concrete wall, apply a vapor barrier first to prevent moisture damage.
The door is critical. A standard hollow-core door leaks air like a sieve. Upgrade to a solid-core or insulated exterior-style door, seal the frame with weatherstripping, and install a threshold to block drafts. You can find pre-hung insulated doors at any big-box retailer for $150–$300.
For cooling, split-system units (wall-mounted or ducted) outperform portable AC units because they remove humidity better and maintain tighter temperature control. Install the evaporator (cold part) inside your cellar and route refrigerant lines through the wall to an outdoor condenser. If you’re in an apartment or can’t install outside equipment, a high-capacity wine cooler unit (like a commercial drop-in model) works, but costs more upfront and requires more frequent maintenance.
Humidity control matters as much as temperature. If your region is dry, a humidifier keeps corks from drying and bottles from leaking. If it’s humid, a small dehumidifier prevents mold on labels and cork mold. Both run $100–$300.
Designing Your Wine Storage Layout
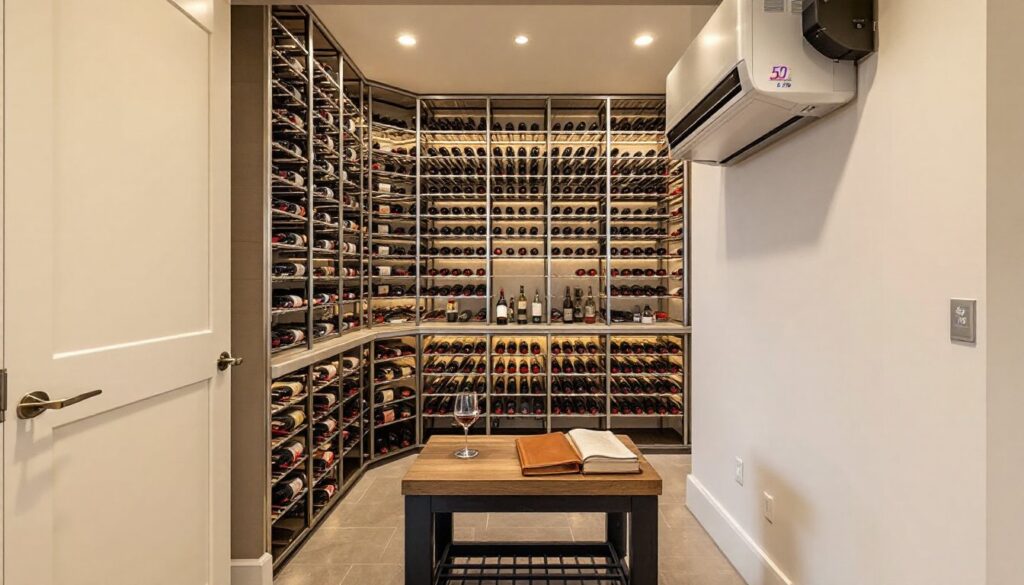
Layout depends on your collection size and access habits. A casual collector might prefer a few tall shelves and open floor space. A serious collector stores bottles horizontally (label facing out for quick ID) on racking systems.
Horizontal storage keeps the cork moist and prevents oxygen from seeping in. Metal or wood racking systems hold bottles at a gentle angle. Calculate bottles per rack: standard racks are 2–4 feet wide and hold 20–50 bottles per row, depending on design. A 4×6 closet with floor-to-ceiling racking (five rows, 3 feet wide) fits roughly 300 bottles.
Leave space for a small table or counter, you’ll want a spot to set glasses, check labels, or record inventory. Good lighting is non-negotiable. LED lights produce minimal heat and don’t degrade labels. Avoid incandescent bulbs: they generate too much warmth. Install dimmable switches so you’re not blasting harsh light every time you grab a bottle.
Floor material should resist moisture. Sealed concrete, vinyl flooring, or tile works: avoid carpet, which traps humidity and mold. If your cellar will have a tasting area, consider epoxy-coated concrete for easy cleanup and durability.
Ventilation inside the cellar matters too. Air needs to circulate so cooling is even and no dead spots develop. Small circulation fans mounted in corners (low speed, minimal noise) keep air moving without creating vibration. Position the cooling unit intake and exhaust so they don’t short-circuit, cold air shouldn’t blow directly back into the intake.
Materials And Finishing Touches
Your material list depends on whether you’re converting existing space or building from scratch. For a modest cellar retrofit:
Insulation & Sealing:
• Rigid foam boards or fiberglass batts (R-10 to R-20)
• Caulk, weatherstripping, and expanding foam
• Vapor barrier (6-mil polyethylene or commercial product)
Framing & Finishing:
• 2×4 studs if you’re furring out walls (optional, simplifies foam installation)
• Drywall or moisture-resistant panels
• Paint (matte or low-sheen enamel in light color to reflect what little light you have)
Climate Control:
• Split-system cooler ($1,500–$4,000) or wine cooler unit ($800–$2,500)
• Humidifier or dehumidifier ($100–$300)
• Thermometer and hygrometer to monitor temps and humidity ($20–$50)
Storage & Lighting:
• Wine racking (metal or wood, $300–$1,500 depending on capacity)
• LED strip lights or recessed fixtures ($100–$300)
• Solid-core or insulated door with weatherstripping ($200–$400)
Finishing touches elevate the space without much extra cost. A light wood or stone-look vinyl on the floor gives it character. Paint walls a soft, warm color, pale gray or cream hides dust better than stark white and feels less clinical. If you’re handy with woodworking, projects like custom wine storage or built-in shelving add both function and visual polish.
Electrical work: run a dedicated circuit to your cooling unit (it draws steady current and shouldn’t share a circuit with lights or other equipment). If you’re uncomfortable running new circuits, hire a licensed electrician, mistakes here risk fire or shock hazards.
Maintenance And Long-Term Wine Preservation
Once your cellar is built, maintenance is straightforward but consistent. Check temperature and humidity readings weekly. Most wine coolers include digital displays: if yours doesn’t, a $20 wireless thermometer-hygrometer lets you monitor from outside the cellar.
Clean cooling unit filters monthly (or per manufacturer specs). Dust buildup reduces efficiency and wastes energy. If you installed a split system, have it serviced annually by an HVAC tech, refrigerant systems need periodic checks to stay efficient and leak-free.
Keep the space dry. Wipe down condensation on walls or pipes immediately. If you notice mold on labels or cork, increase air circulation and reduce humidity. A small circulation fan or brief dehumidifier run usually solves it.
Ventilation prevents stale air and keeps CO₂ from building up (wine releases small amounts as it ages). Crack the door or run a fan for 15 minutes every few weeks, even if it’s not cooling season.
Wine itself needs minimal intervention. Store bottles on their side (labels visible), keep them in the dark, and maintain your setpoint temperature. Check older bottles annually, if a cork looks pushed out or wine level has dropped noticeably, the bottle may be compromised.
Many homeowners use project planning resources to track renovation costs and timelines, which extends to ongoing maintenance schedules and budgeting for HVAC service calls. Document your setup, take photos of how racking is arranged, note your cooling unit model and settings, and keep an inventory of your collection. When something breaks or needs replacement, you’ll know exactly what you need.
Conclusion
Building a wine cellar is a project that pays dividends in both function and pride. The work itself, insulation, framing, cooling setup, is within reach for most DIYers, though climate control and electrical work may justify professional help. Start small, test your setup with a few bottles, and adjust as needed. A proper wine cellar isn’t fancy: it’s just a space that does one job really well: keeping wine at the right temperature, humidity, and darkness so it ages exactly as intended.